- Follow the guidelines on the General Aftercare page and the below instructions to retain pigments and avoid infections.
- How to care for your brows
- If there is any swelling, apply an ice pack to the area for 15-minute sessions
- With clean hands, apply nano silver to clean the eyebrows at least 2x a day, as long as needed.
- Apply ointment with a Q-tip 5-7 times a day or as often as needed for the first week. If the Bag Balm ointment is itchy, use vitamin E or Coconut oil instead.
- The second week, use new sunscreen Chapstick on your brows to keep them moist.
- Avoid using any eyebrow makeup until fully healed.
- Consider your skin type
- Oily Skin: Clean the area more frequently to manage excess oil but ensure it’s not too dry.
- Dry Skin: Focus on keeping the area well-moisturized to prevent cracking.
- Sensitive Skin: Use hypoallergenic products to avoid irritation.
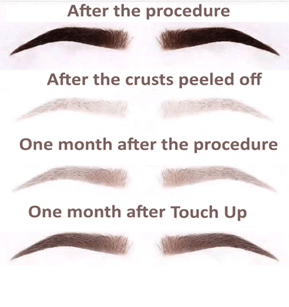
- The healing process
Eyebrows look 10-20% darker after they are done. They also look thicker than what they are going to be later. They look really drawn on for the first 5 days. After they peel in 5-7 days, they will look a lot lighter and softened. Most small flaws that you might see in the first 5 days go away after they are healed. The color usually disappears for 2 weeks and will come back. Brows change color a lot in the first 2 weeks. It’s normal for them to appear more yellow, orange, green, or red for a time. The brows may look light in spots until the end of the 3rd week. You will know the color, shape, and results in 3 weeks. Eyebrows will have some missing spots, so a touchup will be needed for it to look its best.
Eyebrows are dry for two weeks. Keeping them really moist and using silver will make them heal faster.
Days 1-3: Immediate Reactions
During the first few days, you can expect swelling and darkening of the pigment. The treated area may appear much bolder and darker than anticipated due to the natural oxidation process and swelling. Apply the recommended ointments sparingly and avoid touching or scratching the area.
Days 4-7: Scabbing and Flaking
Around this time, you will notice scabbing and flaking as your skin begins to heal. It’s vital to let the scabs fall off naturally without picking at them to avoid pigment loss and scarring. Your skin may feel tight and dry, and you should continue to follow gentle cleansing routines.
Days 8-14: Skin Settling
By the second week, the major healing phase starts to settle. Most of the scabs will have fallen off, and the pigment will appear lighter. Keep the area clean and moisturized, and avoid any makeup on the treated areas.
Days 15-40: Pigment Settling and Final Stages
Although the visible symptoms have diminished, the pigment will continue to settle into your skin. It’s important to avoid any harsh skin care treatments and prolonged sun exposure. The final results will be more apparent by the end of this period, with a touch-up session often recommended to perfect the look.